
|
|
posted: November 1, 2018
tl;dr: Adding a few features in exchange for a few dollars a month...
I’m still awed by the page load time performance of my $0/month, ad-free, tracking-free, censorship-free, screaming fast website at http://chrisshaver64.ddns.net. It’s been highly reliable, except for a few power outages. I wanted to see how cheaply I could build and operate a website, and I’d still be hard pressed to do it cheaper today. It does rely upon the continued goodwill of one company, noip.com, which has provided free DNS for subdomains for years.
It does have a few shortcomings. I have yet to get around to enabling HTTPS support; I just haven’t found the time to give Let’s Encrypt a try on the Raspberry Pi. Over the past few years web browsers have provided increasingly dire warnings to users when they visit an unencrypted HTTP site, which can scare them away. My site URL has a personalized subdomain, but a personalized domain name would be more welcoming. Finally, since my $0/month website is a physical server installed in a house that I am in the process of vacating, there would be some downtime while the Raspberry Pi is in transit to its new data center, i.e. a drawer in my new house. Or I could buy a second Raspberry Pi for $35 plus a memory card and case, but that would double my server capex. There also is a minor concern about my new ISP potentially blocking me from hosting a web server, although I’m definitely going to try.
My new employer, meltmedia, uses Amazon Web Services (AWS) quite extensively. When I saw how easy and, more importantly for the purposes of my web hosting adventures, how cheap it is to host a static website in AWS, I decided to bite the bullet and create a second instantiation of my website with the same content. It’s not free, but the cost is under $2/month. Here’s how I did it.
First, sign up for an AWS free tier account. This provides access to AWS services and a certain amount of usage of them for free. AWS providing free accounts is not entirely an act of charity; they are of course hoping that you’ll develop some sort of application that incurs some actual charges, as does my new website.
Cloud website hosting can be inexpensive
Setting up an unencrypted HTTP website in AWS is trivially easy when using AWS Simple Storage Service (S3). You simply configure an S3 Bucket with a policy that provides public read access to the bucket, turn on web hosting for the bucket, and put the files for all the static site content (HTML, CSS, Javascript, images, and other assets) into the bucket. AWS has done all the heavy lifting by integrating web server functionality into the S3 service (my other site uses Tornado and a Python program that I have to update to add new routes to new pages). To generate all the site content files in an organized directory structure that works for the S3 web server, I use the website-scraper Nodejs npm library and scrape my original Tornado+Python website while it is either running on localhost or on the Raspberry Pi.
Some might be tempted to stop there, as AWS does not provide many warnings about running an HTTP site. This stands in contrast to Google, which is taking many steps to discourage HTTP and encourage HTTPS: security warnings in the Chrome browser, ranking HTTPS sites ahead of HTTP sites in Google search, and funding Let’s Encrypt. This also is not an act of charity. Google’s primary business model is built upon advertising, and encrypting traffic from even harmless, fully public sites like mine, with no sensitive information, means that no intermediary can insert ads into the content as it traverses the Internet to the user.
Although it is more involved to set up a site in AWS with a custom domain name and HTTPS, which requires an SSL certificate, I’m impressed with how streamlined and inexpensive Amazon has made the process. I am used to the old days, when domain names were purchased from registrars, and SSL certificates were obtained from a dedicated certificate authority such as RapidSSL. The process for each usually took days; domain names started at around $35/year; and SSL certificates might be over $200/year for a wildcard certificate. AWS claimed to offer .com domains starting at $12/year and free SSL certificates, and that triggered me to move forward with this project.
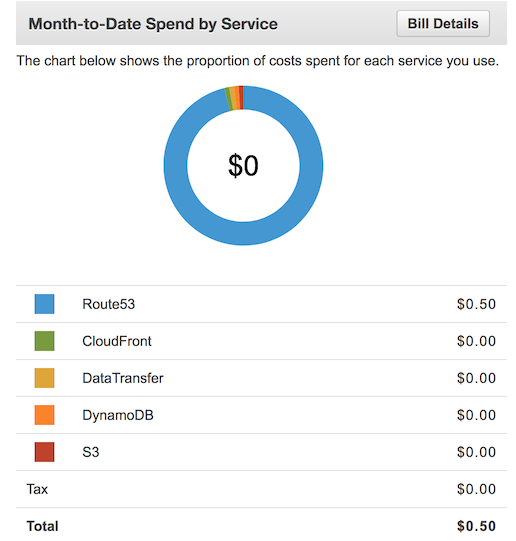
I was indeed able to pick up cjshaver.com on AWS for $24 for two years, which accounts for $1/month of the costs of my new website. The SSL certificate was free. I’m getting hit with a 50 cent/month charge for DNS. There are no other charges, thanks to the AWS free tier. So for now my new site costs under $2/month.
Here are the steps involved, including links to the AWS documentation, which in general is pretty thorough and mostly accurate:
Enjoy the encryption and the new domain name!